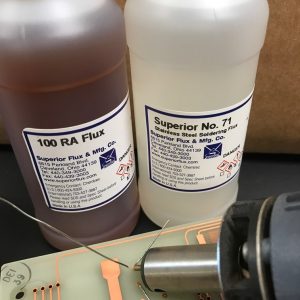
How can you bond a delicate PCB with a stainless steel component?
What kind of flux should you use for soldering a stainless steel component to a PCB (printed circuit board)? We get this question a fair amount, and it’s a good one. The issue, of course, is the stainless steel. It is quick to recreate its protective layer to avoid corrosion over time and that barrier makes it difficult for a solder alloy to bond properly and wet to the surface.
But what’s really the problem? After all, there are certainly fluxes for soldering stainless steel. For instance, our No. 71 (link) is excellent for soldering stainless steel, exhibiting great results with even the simple eutectic solders such as Sn96.5/Ag3.5 (tin-silver) or Sn63/Pb37 (tin-lead). So you have a flux, No. 71, to make stainless steel soldering possible. You have a stainless steel component and an empty spot on the circuit board. So why can’t you just use our No. 71 to solder the stainless steel component to the board?
The answer is you can – sort of. Theoretically, you can use the No. 71 to solder a stainless steel component directly to a PCB, but you run the strong risk of ruining the board. That’s because fluxes that are active enough to solder stainless steel contain corrosive compounds such as zinc chloride and other halides. These activators, when left on the PCB in the form of corrosive flux residues, cause all kinds of problems afterwards. Whether or not the post-soldering flux residues can be washed off with water is less of a consideration than you might think. The residues have a way of wandering off where you least want them. And when they contain something as strong as zinc chloride, you’re asking for trouble.
So, what do you do? What kind of flux should you use to solder the stainless steel component to the PCB?
There are a couple of options.
Option 1, explained below, offers an option for soldering a stainless steel component directly to a PCB in one step. Option 2, detailed below, offers a method for using No. 71, but in a way that keeps its strong residues away from the PCB.
Option 1
Certain activated rosin fluxes (classified as Type RA), such as our No. 100, can successfully solder stainless steel to copper. Data sheets for it can be found on the main data sheet page or at the bottom of this post.
Keep in mind two things when using our No. 100 RA flux to solder stainless steel to copper:
- Soldering stainless steel is not as easy as soldering copper. You’ll need to heat up the stainless steel more than you would need to heat up copper. This could involve pre-heating the stainless steel component with your soldering iron to get it up to ideal soldering temperature.
- Activated rosin fluxes, such as the No. 100, are NOT No-Clean fluxes. You need to clean off the flux residues with a solvent, such as isopropyl alcohol (99%) or mineral spirits. Clean off the residues well, otherwise the activators from the flux could damage the PCB afterwards.
If using the No. 100 Type RA rosin flux does not yield good results, then it’s likely the particular stainless steel in your component is not conducive to soldering. Fortunately, there is a second option.
Option 2
This option involves pre-tinning the stainless steel component using our No. 71 Stainless Steel Soldering Flux together with a tin-lead solder (Sn63/Pb37) or a Lead-Free solder that contains silver (such as the Sn96.5/Ag3.5).
What you are effectively doing is covering the stainless steel part with a layer of tin, so that when it comes time to actually solder the stainless steel component to the PCB, you are no longer soldering a stainless steel surface to the PCB, but rather you are soldering a tin surface to the board. (In this process you are actually soldering the stainless steel component twice: once when you tin it, and a second time when you solder it to the PCB.)
There are two ways of accomplishing this:
First Way of Pre-Tinning a Stainless Steel Component (Solder Pot Method)
- Dip the component in No. 71 flux.
- Dip the fluxed component into a solder pot with molten solder (Sn63/Pb37, Sn96.5/Ag3.5). This will coat the stainless steel component with a layer of the filler alloy.
- Allow tinned component to cool off so solder can harden.
- WASH OFF THE No. 71 FLUX RESIDUES WITH WATER!
- Dry off the component so there is no water left on part. A final rinse with isopropyl alcohol (99%) will speed up the process of removing the water, but is optional.
- Now, using a No-Clean, Rosin, or Organic Acid flux together with solder wire, or using a Cored Solder Wire (rosin, No-Clean or organic acid type), you can simply solder the tinned stainless steel component to the PCB.)
NOTE: To purchase the No. 100, please contact us.
Second Way of Pre-Tinning a Stainless Steel Component (Solder Wire Method)
- Dip the component in No. 71 flux.
- Using a solder iron or hot plate, preheat the stainless steel component.
- Continuing to heat the stainless steel component, introduce a Solid solder wire (Sn63/Pb37, Sn96.5/Ag3.5) to the fluxed area of the stainless steel component. Add more flux if necessary. (Note: you’ll likely need to use a clamp or vice to hold the component, since you need one hand to hold the soldering iron and a second to introduce the wire.)
- Allow tinned component to cool off so solder can harden.
- WASH OFF THE No. 71 FLUX RESIDUES WITH WATER!
- Dry off the component so there is no water left on part. A final rinse with isopropyl alcohol (99%) will speed up the process of removing the water, but is optional.
- Now, using a No-Clean, Rosin, or Organic Acid flux together with solder wire, or using a Flux-Cored Solder Wire (rosin, No-Clean or organic acid type), you can simply solder the tinned stainless steel component to the PCB.)
NOTE: To purchase the No. 71 go to www.sra-solder.com.
If you have any questions about these processes or other flux applications, please contact us.


